ACTIVATING RYE STARTER FLAKES

IMPORTANT NOTES:
Before beginning this step, please review our Wheat-Based Bread Kit Guide to ensure you’re fully prepared.
The following instructions are Part 1 of a two-part series created specifically for users of our Sourdough Mate Organic Wheat-Based Kits.
For gluten free instructions, please click here Gluten-Free Starter Flakes
Bread Flour
Our Organic Wheat-Based Sourdough Kits include 3kg of premium organic flour— 2kg of White and 1kg of Whole-Wheat. For a strong and resilient starter, we recommend feeding it with a 50/50 blend of both flours. The wholegrain flour provides an extra nutritional boost and supports the growth of healthy wild yeasts and lactic acid bacteria that make a robust, active starter.
Of course, you can also choose to use only the Kialla Organic Plain White flour provided or purchase whole-rye flour (the choice is yours) — your starter will still thrive beautifully.
Water
Any drinkable tap water is perfectly fine for feeding your starter. However, if your tap water contains high levels of chlorine, it may slow or inhibit starter activity. To reduce chlorine, simply fill a jug with tap water and let it sit uncovered on the counter overnight before using. This allows the chlorine to naturally dissipate, making it gentler on your starter.
Temperature
Keeping your starter at an optimal temperature of around 24-26°C will help it grow and develop as expected. If your room temperature is cooler — below 21°C or tends to drop overnight — your starter’s activity may slow down significantly. In this case, it may take up to 48 hours to show signs of life, so don’t worry — just be patient and give it time to catch up.
Tips for Cold Kitchens
If your kitchen is cool during winter or overnight, place your starter in the oven or microwave (turned off) alongside a bowl of hot water, then close the door. This creates a warm, gentle environment that helps maintain the ideal temperature for your starter to stay active and happy.
Using Your Starter
When using your active starter for baking, always leave a small portion behind — a tablespoon is sufficient — to maintain a continuous fermentation cycle. Replace what you’ve used by feeding the remaining starter with equal parts flour and water. For more detailed guidance on keeping your starter healthy, visit our Starter Maintenance page.
VIDEO INSTRUCTIONS
Watch the video and read the instructions to see how your starter should look and feel, then follow the written method below carefully.
METHOD
In ideal conditions (around 24–26°C), your starter should be ready to use within 24 hours — bubbly, risen, and pleasantly sour. The following instructions are a guide only and will depend on your kitchen temperature.
1. Rehydrate the Starter
In a cleaned and sterilised jar, stir together 50ml of lukewarm water with all of the starter flakes. It is important to let them soak for 15 minutes (longer if still hard) to soften & dissolve well by using a spoon or spatula to break up any lumps before adding flour.
2. First Feed
Add 40g of bread flour (we recommend a 50/50 mix of White & Wholegrain flours, or you can use whole rye flour). Using a spoon or jar spatula, mix thoroughly until there are no dry lumps and the flakes are well incorporated. The mixture should have a thick, porridge-like consistency. If it is hard to stir than add a few more grams of water until you get the right consistency (see

3. Wait and Watch
Place the jar in a warm room at around 24-26°C. Most starters, under ideal conditions, will start showing signs of activation within 12 hours with small air bubbles appearing at the base of the jar. When this happens, you’re ready for the second feed.

Above: small bubbles is a great sign your starter is moving along as normal. This is an example of a starter that has been sitting overnight for 12 hours in a relatively cold kitchen of 10-12ºC.
Note: Starter activity depends on room temperature — cooler kitchens will slow things down, while warmer ones speed it up. If activity is sluggish and slow after 12 hours, refer to the “Tips for Cold Kitchens” above to help move things along. As long as your starter is showing tiny bubbles (refer to image above), it’s fine to move on to the second feed once 24 hours have passed since the first feed.
4. Second Feed
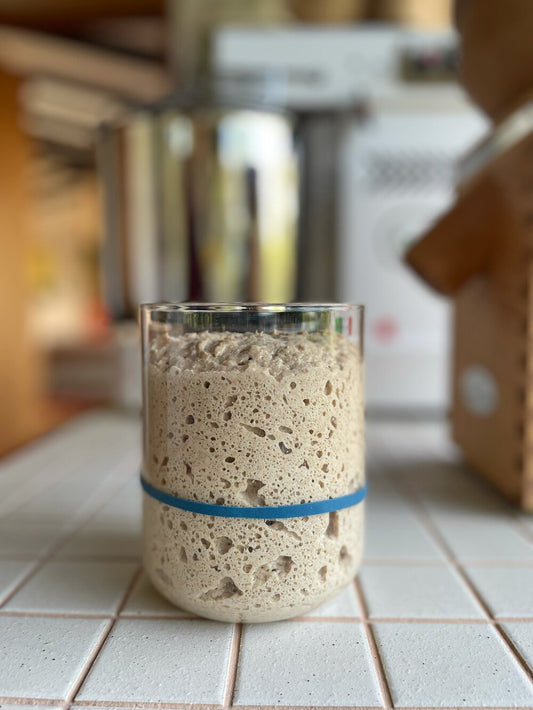
Feed the starter again with equal parts water and flour (40g each). Stir well, mark your starter's level with a rubber band (placing it around the jar) and leave it in a warm room at 24-26°C until more bubbles appear.
5. Wait and Watch Closely
At this stage, your starter should be moving much faster. You should see it double in size and typically become bubbly and aromatic within 3-12 hours, depending on your kitchen temperature.
Keep a close eye on it — the peak of activity only lasts a few hours before the starter begins to sink again. Aim to use your starter when it is nicely bubbly and has a pleasant, slightly fruity aroma.

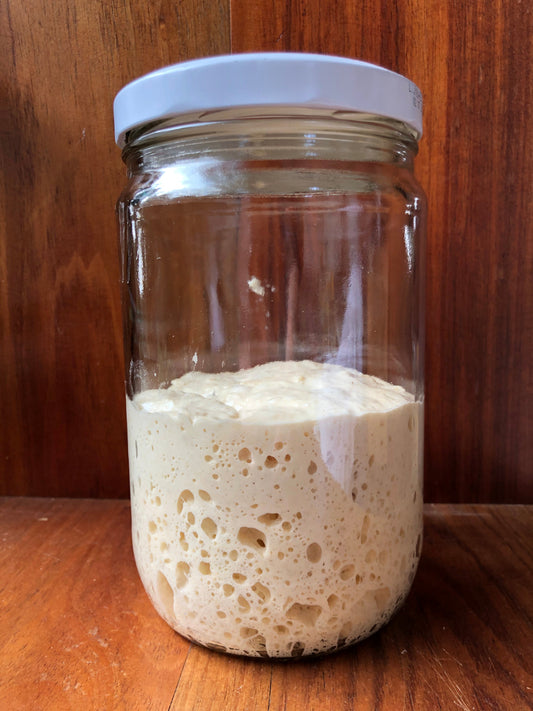
Above: starter is active when it looks like this on top.

Above: starter is active when the side walls have lots on tiny little bubbles.
6. Ready to Bake
Proceed to Part 2 of the Bread Kit Guide.
If my starter is active and I’m not ready to bake, what should I do?
If your starter is bubbly and ready to bake but you don’t have time to make a loaf, don’t stress — it’s easy to pause things.
1. Pop it in the fridge.
Once your starter has peaked (doubled in size and full of bubbles), place it in the fridge. The cold slows fermentation right down, so your starter will stay healthy and active for several days without needing to be fed.
2. Feed it again before baking.
When you’re ready to bake again, take your starter out and give it a feed at room temperature. Let it warm up and become bubbly again before using it in dough — this usually takes 4–8 hours depending on your kitchen temperature.
3. Keep your routine simple.
If you’re not baking often, just feed your starter once a week to keep it happy. It doesn’t need constant attention — it’s surprisingly resilient.
In Short:
If your starter is active but you’re not ready to bake, simply refrigerate it. When you’re ready, bring it back to room temperature, feed it, and wait until it’s bubbly again before using. Read the FAQ’s on starters or check out the starter maintenance page for more useful tips.
Enjoy the journey!
– Anh 💛

Above: example of an active white flour wheat starter that has "peaked".
Above: example of an active whole-rye starter that has "peaked".


