Gluten-Free Frequently Ask Questions

1. My starter flakes were rehydrated & fed 24 hours ago, but there are no bubbles or signs of activity.
First, double-check that you've followed the starter revival instructions correctly.
Common Issues/Mistakes
Room Temperature
Cold environments slow down starter activity. Keep it somewhere warm (ideally around 24–28°C) to help it thrive. Try the following if you have a cold kitchen:
-
-
- Leaving it in the oven with the light on
- Placing a bowl of hot water nearby
- Using a seedling heat mat
-
Flour Used
For best results only use our gluten-free white flour (approved by Coeliac Australia) that came with the GF Sourdough Kit. Avoid supermarket GF plain flour which have emulsifers & insufficient nutrients for the starter to grow. You may use Caputo GF Flour (not approved by Coeliac Australia)
You've Missed the Rise
An active starter will often rise (peak) and then fall back down with bubbles disappearing. If your starter smells sour but has no visible bubbles, it’s possible that you simply missed the rise. Feed it again with equal parts flour/water (30g) and monitor closely after 3-6 hours.
Consistency is key!
If your starter is too dry or too runny, it may not form visible bubbles even though there’s activity happening underneath. Make sure to mix it well and aim for the right texture — thick but easy to mix, like smooth pancake batter.
Note:
If your starter is only showing a few small bubbles after 24 hours from the first feed, don’t worry — just feed it again (second time) with 30g of flour and 30g of water. Within 3-6 hours, you should see more bubbles and activity. Once this happens, you're ready to make bread with it. Move to the next step – Part 2: Let's make sourdough.
2. Why is there only one proving stage in gluten-free sourdough?
Gluten-free dough lacks gluten — the protein network that gives regular dough its elasticity, strength, and ability to trap gas over long fermentation periods. Without gluten:
- The dough structure is more delicate.
- It can’t stretch and hold its shape through multiple rises.
- Over-fermentation or multiple proofing stages often cause the dough to collapse or become gummy.
Typical Process for Gluten-Free Sourdough:
- Mix the dough.
- Let it prove once (often in a proving banneton or tin) until risen.
- Bake.
How Long to Prove For?
- At typical room temperature (21–24°C), it usually takes up 8 hours.
- In cooler environments, longer than 8 hours.
- Times are only guidelines, its best to read your dough!
Pro Tip: The process is complete when the dough has risen by up to 50%. Always judge by the dough's rise and feel rather than relying strictly on the clock — warmer temperatures speed up fermentation, while cooler ones slow it down.
3. Once activated, how do I feed my sourdough starter — and how often?
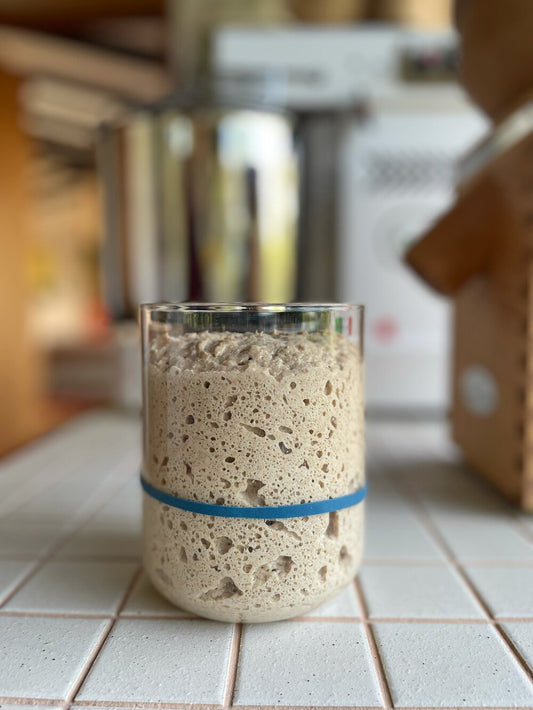
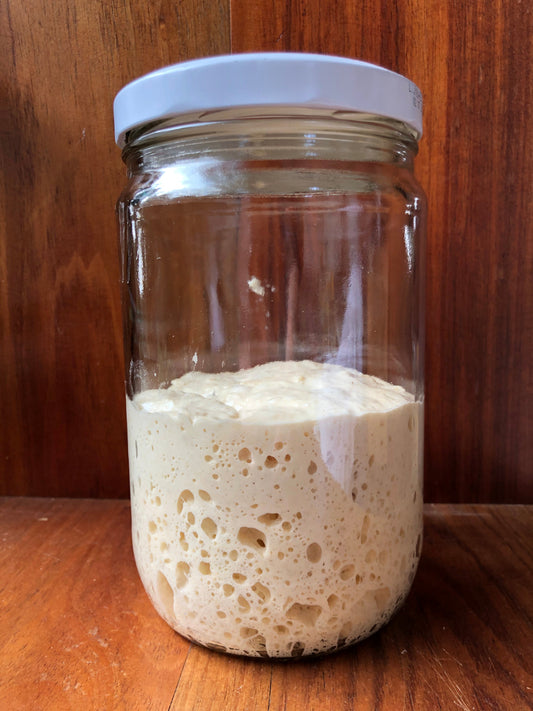
A healthy starter should have bubbles, smell mildly sweet with a slight sour note. Recommended read: Maintaining a Gluten-Free Sourdough Starter
If Kept at Room Temperature (for regular baking):
- Feed every 12-24 hours, depending on how active your starter is and your kitchen temperature.
- In a warm environment (22-26°C), daily feeding is usually enough.
- If your starter is very active, you may need to feed every 12 hours to keep it from over-fermenting.
Ideal for: When you're baking regularly, every second day.
If Stored in the Fridge (for occasional baking):
- Feed once a week, even if you're not baking.
- To bake, take it out, let it come to room temp, and give it at least 1-2 feeds to reactivate it before using.
Ideal for: Casual bakers or those who only bake once a week or less.
Before Baking:
Your starter is ready to use when it has:
- Doubled in volume.
- A bubbly, airy texture.
- A mild, tangy aroma.
After removing the amount you need for baking, feed the remaining starter and continue your usual feeding schedule.
Neglected starters — are prone to mould or at risk of bad bacteria taking over so don't forget to feed your starter when it is hungry!
Here’s how to refresh a very sour starter (hungry starter):
If your starter has been neglected or left unfed for a while, you can revive it by using a 1:4:4 feeding ratio (1 part starter, 4 parts flour, 4 parts water) :
For example:
5g starter + 20g flour + 20g filtered water
This higher ratio of fresh flour and water helps:
- Dilute excess acidity
- Encourage strong fermentation activity.
- Bring your starter back to a healthy, balanced state.
Pro Tip: You may need to repeat this refresh once or twice, depending on how long the starter has been neglected. Look for signs of recovery — bubbles, rise, and a pleasant aroma — before baking with it.
4. What is a starter build — and when should I do one?
A starter build refers to the process of preparing your sourdough starter for baking by giving it a specific feeding, often timed and measured, to ensure it's at peak activity when you mix your dough.
Typical Starter Build Process:
1. Discard & Feed:
Take a small amount of mature starter (e.g., 20–50g) and feed it with fresh flour and water, often at a specific ratio (commonly 1:1:1 or 1:3:3, but some prefer 1:4:4 for reducing acidity).
Pro Tip: If using the same jar, simply discard all but 20–50g of the starter, then add your flour and water. Stir well until smooth.
2. Timing:
Let the build ferment at room temperature (around 21–24°C) until it:
- Doubles in size.
- Becomes bubbly and airy.
- Has a mild, tangy aroma.
This typically takes 3 to 5 hours, depending on temperature and your starter's health.
3. Use at Peak:
Once the starter has peaked (doubled or slightly domed at the top), it’s ready to use in your sourdough recipe.
Why Do a Starter Build?
- Increases the reliability of your bake.
- Ensures your starter is strong and active.
- Helps control flavour (less sour if you use a young, freshly built starter).
- Especially important if your starter lives in the fridge most of the time.
5. How Do I Best Store My Sourdough Starter?
You have two main options for storing your sourdough starter, depending on how often you bake:
Room Temperature Storage (For Regular Baking)
- Ideal if you bake daily or every couple of days.
- Keep your starter in a clean jar, covered loosely (to allow airflow).
- Feed it once a day (min. every 24 hours) with equal parts flour and water by weight.
- Best kept in a spot away from direct sunlight and drafts (around 21–24°C).
Fridge Storage (For Occasional Baking)
- Ideal if you bake once a week or less.
- Feed your starter, let it sit at room temperature for 1–2 hours, then store it in the fridge.
- It can safely stay in the fridge for up to 2 weeks without feeding. Ensure it is stored in an air-tight jar to prevent cross contamination.
- To revive, take it out, let it come to room temperature, discard most of it, and feed as usual.
- You may need 1–2 feeds to fully reactivate it before baking.
Pro Tip: For longer-term storage, you can dry your starter or store it as flakes — perfect for backup in case of mishaps.
6. What can I do with sourdough discard?
Don’t throw it out! If its not off or too sour than use it in discard recipes like pancakes, crackers, or muffins. Use it where you normally use baking powder!
7. Can I keep my starter at room temperature?
Yes, at 21–24°C you’ll need to feed it every 24 hours otherwise it will eat itself and turn into acetone! In cooler conditions (10–16°C, you may stretch out to every 48 hours, but any longer (neglect) can lead to mould developing. Otherwise best kept in the fridge (see note 5 above).
8. What if my room is too cold?
Cold slows down your starter. Try:
- Leaving it in the oven with the light on
- Placing a bowl of hot water nearby
- Using a seedling heat mat
Do not exceed 58°C — high temperatures can kill your starter.
9. My starter smells bad or mould. Can I save it?
No — unfortunately this will need to be composted! Start again with our Gluten-Free Starter Flakes.
10. How do I prepare my starter for baking after storing it in the fridge?
If stored for up to 1 week:
- Let it come to room temperature
- Do your starter build based on the recipe
If stored for up to 2 weeks (risk of mould is higher):
- Bring to room temp
- Feed once using a 1:4:4 ratio (e.g., 5g starter + 20g flour + 20g water)
- Once it doubles, do your starter build
11. Can I leave my starter in the fridge for a month or more?
It’s not ideal, but possible with care.
You must refresh it every 2 weeks using a 1:4:4 feed
Before baking:
- Bring it to room temperature
- Feed it once (1:4:4)
- Wait for it to bubbly
- Then do your starter build
12. Taking a break from baking (2–12 months)?
Dehydrate Your Starter!
- Feed with a 1:1:2 ratio (more water)
- Once bubbly, spread thinly on baking paper
- Let it dry out completely until flaky
- Crush and store in an airtight jar
To reactivate, just follow the same steps used for rehydrating your original flakes.
13. How do I store sourdough bread to keep it fresher for longer?
To keep your sourdough bread fresh, store it in a cotton bread bag, or simply wrap it in a clean tea towel. This allows the bread to breathe, preventing excess moisture buildup while protecting the crust.
It's best to store your bread in a cool, dry place, like a bread box or on the kitchen counter — away from direct sunlight.
Avoid storing sourdough bread in the fridge, as this accelerates the staling process and dries the bread out.
For longer-term storage, you can slice the bread and freeze it. Simply toast or reheat slices as needed.
14. What type of water should I use?
Drinkable tap water is fine, unless it's high in chlorine. If unsure:
- Fill a jug with tap water and leave it uncovered overnight
- Or simply use filtered water
15. How to bake sourdough without a Dutch oven?
Option 1: Baking Tray + Water Tray (Most Common Alternative)
You’ll need:
- A baking stone or an inverted heavy baking tray
- Another metal tray or dish (for steam)
Steps:
- Preheat your oven with the baking stone/tray inside to 230–250°C (450–480°F) for at least 30–45 minutes.
- Place another empty metal tray (not glass!) on the bottom rack during preheating.
- Transfer your scored sourdough onto the hot baking surface (use parchment + a pizza peel or board).
- Immediately pour about 1 cup of boiling water into the bottom tray and quickly shut the door to trap the steam.
- Bake for 20–25 minutes with steam, then carefully remove the water tray, rotate the loaf if needed, and continue baking another 20–25 minutes until deep golden.
Option 2: Upside-Down Roasting Pan or Large Bowl
If you have:
- A deep roasting pan or
- A large stainless steel bowl
Steps:
- Place your bread on a hot tray or baking stone.
- Cover the loaf with the large bowl or upside-down roasting pan for the first 20–25 minutes.
- Remove the cover and continue baking for 20–25 minutes to brown the crust.
This simulates the steam-trapping effect of a Dutch oven.
Option 3: Covered Roasting Dish or Casserole
Any lidded oven-safe pot or casserole dish (like Pyrex, CorningWare, or even an enamel roaster) can work well.
Just follow your usual Dutch oven routine: preheat the vessel, load the dough, and bake covered first, then uncovered to finish.
Pro Tips for Success:
- Use parchment paper to help transfer dough and prevent sticking. Or purchase our Silicon Dutch Oven Bread Mat.
- A pizza stone or baking steel really helps if you don’t have a heavy base tray.
- Don’t open the oven too early—let the steam do its job for at least the first 20 minutes.
Want To Skill Up Or Need More Help?
Be sure to visit our KNOWLEDGE BASE — you’ll find more helpful resources and sourdough guides there.
For community help, join our friendly Facebook Support Group.
Our support team is always happy to assist with your sourdough questions! Chat with us via the website chat 💬 (located at bottom right corner) Monday to Friday, 9am–5pm.
Please note: Our team is unable to respond to enquiries via social media or WhatsApp. Thank you for your understanding.


